
Managing Team Member Permissions in the Dwolla Dashboard
Your team is growing and doing great things together. You’re busy keeping up with to-do items in the dashboard and there’s not a lot of time for housekeeping tasks.
We’ve got you, dashboard account owners.
Giving the right permissions to your team members ultimately allows you to manage access to sensitive information and operations. When you equip your team members to do their jobs well, they can then focus on delighting your customers each day.
Here’s a guide to managing individual team members in the dashboard and assigning them the correct permissions.
Getting Started
There are a few things to consider when managing team members in the dashboard:
- Each team member needs their own login and password. If your team is currently sharing an account, designate a senior team member to manage the admin account and send invitations to each team member.
- Dashboard user invitations are good for 72 hours. If an invitation expires, it can be resent.
- Dashboard user invitations are good for 72 hours. If an invitation expires, it can be resent.
- If a team member’s role changes, the team admin can update permissions accordingly.
- ‘Edit’ access to the Team page allows you to invite a team member, update team members’ permissions or remove a team member.
- ‘View’ access to the Team page allows you to view a list of your team members that have dashboard access.
Definitions for People Using the Dashboard
- Account Owner: the person who originally created your Dwolla account. If this person no longer handles the day-to-day work in the dashboard, they should reach out to your account manager to update the account owner’s contact information.
- This person will also receive the ‘Admin’ badge on their listing on the team page.
- This person will also receive the ‘Admin’ badge on their listing on the team page.
- Team Member: any individual who has been invited and has access to your company’s dashboard.
Choosing Permissions for a New Team Member
To add a new team member or create an account for an individual team member who was previously sharing an account, follow these steps.
1. Navigate to the Team section on the dashboard.2. Click Invite Team Member (A panel opens).

3. Enter the email address of the team member you want to invite.
4. Select the appropriate level of access for your team member.
- To give edit access to all areas of the dashboard, choose Full Access.
- To configure access to specific areas of the dashboard, choose Custom Access and toggle the areas you would like your team member to access.
- *Note that certain areas allow for either ‘View Only’ access or ‘Edit’ access.
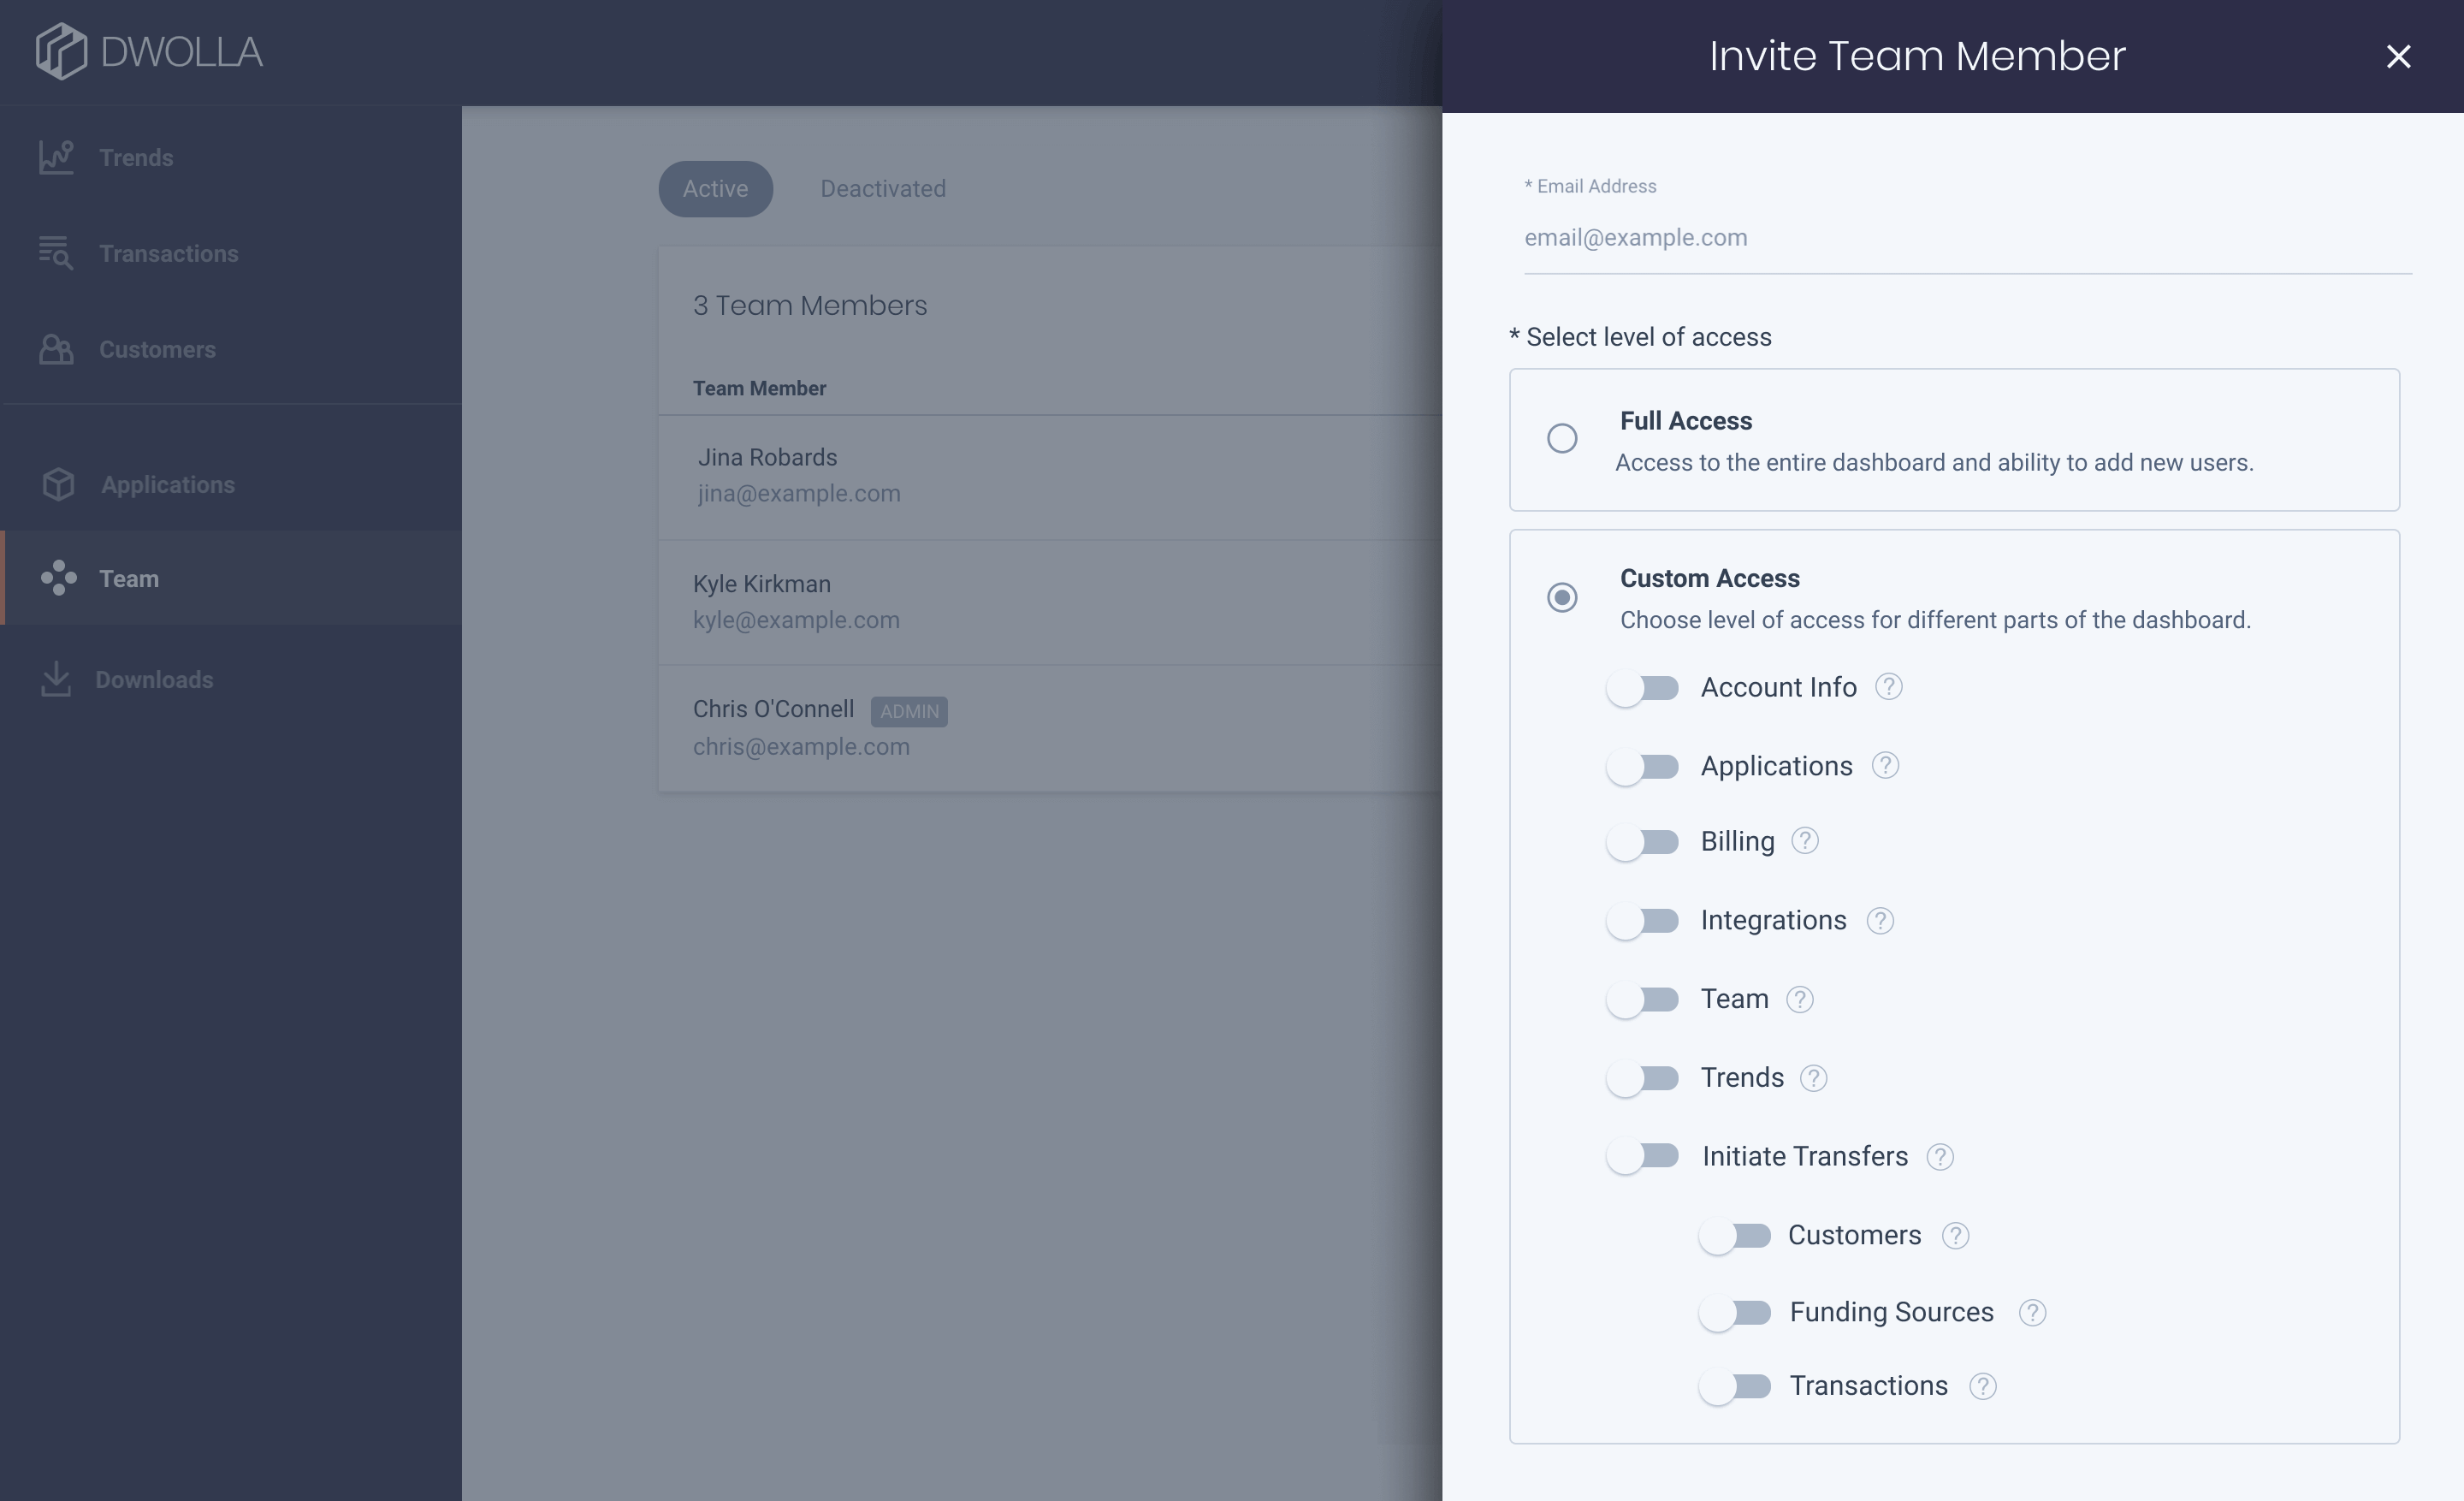
5. Once you have defined the level of access, click Next.
6. Review the confirmation dialog and click Send Invitation.

7. Your invitation has been sent and you will receive an email confirmation.
8. Your team member will receive an invitation and an account must be created within 72 hours.
- If your team member does not accept within that time frame, you can resend the invitation from the Menu Icon on the far right of the row with their name.
- Select Resend Invitation from the dropdown list.
Updating Permissions for an Existing Team Member
If your team member’s responsibilities change, you can update their dashboard access.
To update an existing account:
1. Navigate to the Team section on the dashboard.2. Click the Menu Icon on to the far right of row with the team member you want to edit.
- Select Edit Permissions from the dropdown list (A panel opens).
3. Adjust the level of access for the specific team member. To give edit access to all areas of the dashboard, choose Full Access. To configure access to specific areas of the dashboard, choose Custom Access and toggle the areas you would like them to access.
- Note that some areas allow for either ‘View Only’ access or ‘Edit’ access.
4. Click Save.
5. Your team member’s permissions have been updated and you will receive an email update to confirm.
6. Your team member will receive an email notifying them that their permissions have been updated. If they are currently working in the dashboard, changes will take place when a page is refreshed.
It’s a good idea to review access levels periodically to ensure that your team is using the dashboard effectively.
Deactivate a Team Member
If a team member is no longer needing dashboard access or is leaving your organization, the administrator can deactivate their dashboard account.
1. Navigate to the Team section on the dashboard.
2. Click the Menu Icon on to the far right of the team member you want to deactivate.
3. Select Deactivate User.
4. A confirmation dialog will appear. Choose Deactivate to complete the process.
5. Your team member has been deactivated. You will receive an email update.
6. Click the Deactivated tab at the top of the page to view deactivated team members.
- The person that triggered the deactivation will receive an update. This may or may not be the account administrator.
Reactivate a Team Member
If a team member is going on leave or won’t need dashboard access for an extended period of time, you can deactivate their account and reactivate again later if necessary.
2. Click the Deactivated tab.
Delete an Invitation
Pending or expired invitations can be deleted.
2. Click the Menu Icon on to the far right of the invitation you want to remove.
Glossary of Key Terms
Available Permissions
Access to the dashboard is customizable based on your team’s needs. You can enable full edit access to the dashboard by selecting Full Access or you can select Custom Access and toggle the switches for desired individual permissions.
Account Info
View or edit access
View account-level information such as authorized representative, business contact info, business name and email settings. Edit access allows you to modify contact info and email settings.
Applications
View or edit access
See all applications, keys, secrets and webhook details. Edit access allows you to manage applications and webhook subscriptions.
Billing
View and download your monthly variable fee activity.
Customers
View or edit access; edit access automatically enabled for initiate transfers
View a customer list and see each customer’s specific funding sources and transactions. Edit access allows you to deactivate customers and update email addresses.
Funding Sources
View or edit access; edit access automatically enabled for initiate transfers
View your account’s attached funding sources. Edit access allows you to add and remove funding sources.
Initiate Transfers
View or edit access; selecting edit access automatically enables edit access for customers, funding sources and transactions
Initiate transfers from your balance or an attached funding source. Enabling initiate transfers also allows you to have edit access to customers, funding sources and transactions.
Integrations
View or edit access
View allows you to see existing account integrations. Edit access allows you to enable or remove account integrations.
Transactions
View or edit access; edit access automatically enabled for initiate transfers
View, sort, and filter a list of all transactions that hit your Dwolla account and see transaction details. Edit access allows you to cancel transactions, when applicable.
Team
View or edit access
View a list of team members and their permissions. Edit access allows you to invite new team members, modify permissions, manage password resets and deactivate team members.
Trends
View activity and trends in your Dwolla account.